Image classification from scratch
Author: fchollet
Date created: 2020/04/27
Last modified: 2023/11/09
Description: Training an image classifier from scratch on the Kaggle Cats vs Dogs dataset.

Introduction
This example shows how to do image classification from scratch, starting from JPEG image files on disk, without leveraging pre-trained weights or a pre-made Keras Application model. We demonstrate the workflow on the Kaggle Cats vs Dogs binary classification dataset.
We use the image_dataset_from_directory utility to generate the datasets, and
we use Keras image preprocessing layers for image standardization and data augmentation.
Setup
import os
import numpy as np
import keras
from keras import layers
from tensorflow import data as tf_data
import matplotlib.pyplot as plt
Load the data: the Cats vs Dogs dataset
Raw data download
First, let's download the 786M ZIP archive of the raw data:
!curl -O https://download.microsoft.com/download/3/E/1/3E1C3F21-ECDB-4869-8368-6DEBA77B919F/kagglecatsanddogs_5340.zip
!unzip -q kagglecatsanddogs_5340.zip
!ls
  % Total    % Received % Xferd  Average Speed   Time    Time     Time  Current
                                 Dload  Upload   Total   Spent    Left  Speed
100  786M  100  786M    0     0  11.1M      0  0:01:10  0:01:10 --:--:-- 11.8M

 CDLA-Permissive-2.0.pdf           kagglecatsanddogs_5340.zip
 PetImages                'readme[1].txt'
 image_classification_from_scratch.ipynb
Now we have a PetImages folder which contain two subfolders, Cat and Dog. Each
subfolder contains image files for each category.
!ls PetImages
Cat Dog
Filter out corrupted images
When working with lots of real-world image data, corrupted images are a common occurence. Let's filter out badly-encoded images that do not feature the string "JFIF" in their header.
num_skipped = 0
for folder_name in ("Cat", "Dog"):
    folder_path = os.path.join("PetImages", folder_name)
    for fname in os.listdir(folder_path):
        fpath = os.path.join(folder_path, fname)
        try:
            fobj = open(fpath, "rb")
            is_jfif = b"JFIF" in fobj.peek(10)
        finally:
            fobj.close()

        if not is_jfif:
            num_skipped += 1
            # Delete corrupted image
            os.remove(fpath)

print(f"Deleted {num_skipped} images.")
Deleted 1590 images.
Generate a Dataset
image_size = (180, 180)
batch_size = 128

train_ds, val_ds = keras.utils.image_dataset_from_directory(
    "PetImages",
    validation_split=0.2,
    subset="both",
    seed=1337,
    image_size=image_size,
    batch_size=batch_size,
)
Found 23410 files belonging to 2 classes.
Using 18728 files for training.
Using 4682 files for validation.
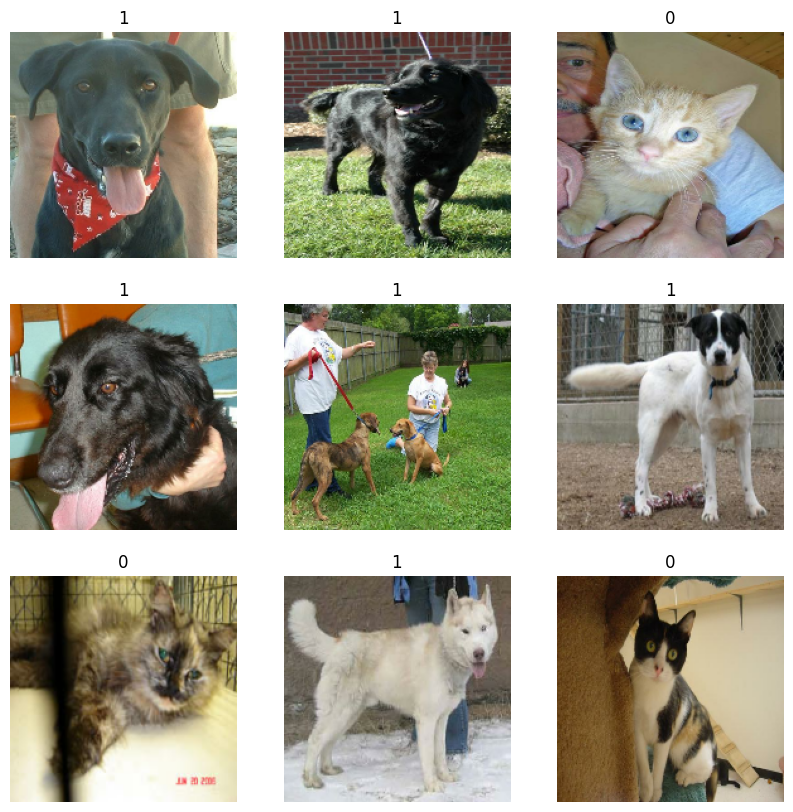
Visualize the data
Here are the first 9 images in the training dataset.
plt.figure(figsize=(10, 10))
for images, labels in train_ds.take(1):
    for i in range(9):
        ax = plt.subplot(3, 3, i + 1)
        plt.imshow(np.array(images[i]).astype("uint8"))
        plt.title(int(labels[i]))
        plt.axis("off")
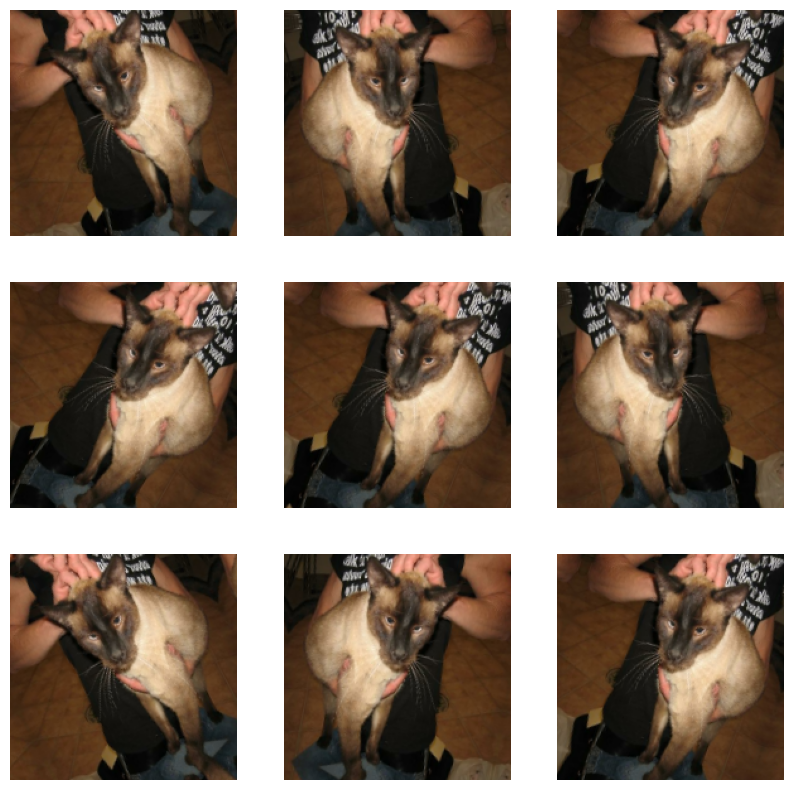
Using image data augmentation
When you don't have a large image dataset, it's a good practice to artificially introduce sample diversity by applying random yet realistic transformations to the training images, such as random horizontal flipping or small random rotations. This helps expose the model to different aspects of the training data while slowing down overfitting.
data_augmentation_layers = [
    layers.RandomFlip("horizontal"),
    layers.RandomRotation(0.1),
]


def data_augmentation(images):
    for layer in data_augmentation_layers:
        images = layer(images)
    return images
Let's visualize what the augmented samples look like, by applying data_augmentation
repeatedly to the first few images in the dataset:
plt.figure(figsize=(10, 10))
for images, _ in train_ds.take(1):
    for i in range(9):
        augmented_images = data_augmentation(images)
        ax = plt.subplot(3, 3, i + 1)
        plt.imshow(np.array(augmented_images[0]).astype("uint8"))
        plt.axis("off")
Standardizing the data
Our image are already in a standard size (180x180), as they are being yielded as
contiguous float32 batches by our dataset. However, their RGB channel values are in
the [0, 255] range. This is not ideal for a neural network;
in general you should seek to make your input values small. Here, we will
standardize values to be in the [0, 1] by using a Rescaling layer at the start of
our model.
Two options to preprocess the data
There are two ways you could be using the data_augmentation preprocessor:
Option 1: Make it part of the model, like this:
inputs = keras.Input(shape=input_shape)
x = data_augmentation(inputs)
x = layers.Rescaling(1./255)(x)
...  # Rest of the model
With this option, your data augmentation will happen on device, synchronously with the rest of the model execution, meaning that it will benefit from GPU acceleration.
Note that data augmentation is inactive at test time, so the input samples will only be
augmented during fit(), not when calling evaluate() or predict().
If you're training on GPU, this may be a good option.
Option 2: apply it to the dataset, so as to obtain a dataset that yields batches of augmented images, like this:
augmented_train_ds = train_ds.map(lambda x, y: (data_augmentation(x), y))
With this option, your data augmentation will happen on CPU, asynchronously, and will be buffered before going into the model.
If you're training on CPU, this is the better option, since it makes data augmentation asynchronous and non-blocking.
In our case, we'll go with the second option. If you're not sure which one to pick, this second option (asynchronous preprocessing) is always a solid choice.
Configure the dataset for performance
Let's apply data augmentation to our training dataset, and let's make sure to use buffered prefetching so we can yield data from disk without having I/O becoming blocking:
# Apply `data_augmentation` to the training images.
train_ds = train_ds.map(
    lambda img, label: (data_augmentation(img), label),
    num_parallel_calls=tf_data.AUTOTUNE,
)
# Prefetching samples in GPU memory helps maximize GPU utilization.
train_ds = train_ds.prefetch(tf_data.AUTOTUNE)
val_ds = val_ds.prefetch(tf_data.AUTOTUNE)
Build a model
We'll build a small version of the Xception network. We haven't particularly tried to optimize the architecture; if you want to do a systematic search for the best model configuration, consider using KerasTuner.
Note that:
- We start the model with the
data_augmentationpreprocessor, followed by aRescalinglayer. - We include a
Dropoutlayer before the final classification layer.
def make_model(input_shape, num_classes):
    inputs = keras.Input(shape=input_shape)

    # Entry block
    x = layers.Rescaling(1.0 / 255)(inputs)
    x = layers.Conv2D(128, 3, strides=2, padding="same")(x)
    x = layers.BatchNormalization()(x)
    x = layers.Activation("relu")(x)

    previous_block_activation = x  # Set aside residual

    for size in [256, 512, 728]:
        x = layers.Activation("relu")(x)
        x = layers.SeparableConv2D(size, 3, padding="same")(x)
        x = layers.BatchNormalization()(x)

        x = layers.Activation("relu")(x)
        x = layers.SeparableConv2D(size, 3, padding="same")(x)
        x = layers.BatchNormalization()(x)

        x = layers.MaxPooling2D(3, strides=2, padding="same")(x)

        # Project residual
        residual = layers.Conv2D(size, 1, strides=2, padding="same")(
            previous_block_activation
        )
        x = layers.add([x, residual])  # Add back residual
        previous_block_activation = x  # Set aside next residual

    x = layers.SeparableConv2D(1024, 3, padding="same")(x)
    x = layers.BatchNormalization()(x)
    x = layers.Activation("relu")(x)

    x = layers.GlobalAveragePooling2D()(x)
    if num_classes == 2:
        units = 1
    else:
        units = num_classes

    x = layers.Dropout(0.25)(x)
    # We specify activation=None so as to return logits
    outputs = layers.Dense(units, activation=None)(x)
    return keras.Model(inputs, outputs)


model = make_model(input_shape=image_size + (3,), num_classes=2)
keras.utils.plot_model(model, show_shapes=True)

Train the model
epochs = 25

callbacks = [
    keras.callbacks.ModelCheckpoint("save_at_{epoch}.keras"),
]
model.compile(
    optimizer=keras.optimizers.Adam(3e-4),
    loss=keras.losses.BinaryCrossentropy(from_logits=True),
    metrics=[keras.metrics.BinaryAccuracy(name="acc")],
)
model.fit(
    train_ds,
    epochs=epochs,
    callbacks=callbacks,
    validation_data=val_ds,
)
Epoch 1/25
...
Epoch 25/25
 147/147 ━━━━━━━━━━━━━━━━━━━━ 53s 354ms/step - acc: 0.9638 - loss: 0.0903 - val_acc: 0.9382 - val_loss: 0.1542

<keras.src.callbacks.history.History at 0x7f41003c24a0>
We get to >90% validation accuracy after training for 25 epochs on the full dataset (in practice, you can train for 50+ epochs before validation performance starts degrading).
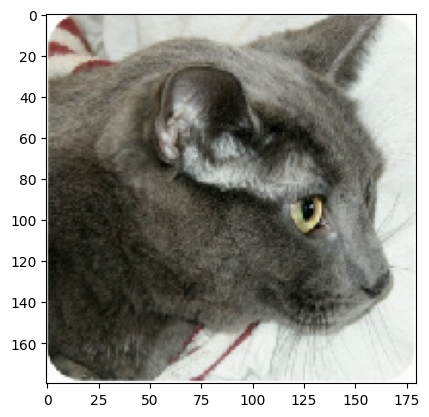
Run inference on new data
Note that data augmentation and dropout are inactive at inference time.
img = keras.utils.load_img("PetImages/Cat/6779.jpg", target_size=image_size)
plt.imshow(img)

img_array = keras.utils.img_to_array(img)
img_array = keras.ops.expand_dims(img_array, 0)  # Create batch axis

predictions = model.predict(img_array)
score = float(keras.ops.sigmoid(predictions[0][0]))
print(f"This image is {100 * (1 - score):.2f}% cat and {100 * score:.2f}% dog.")
 1/1 ━━━━━━━━━━━━━━━━━━━━ 2s 2s/step
This image is 94.30% cat and 5.70% dog.