Stable Diffusion 3 in KerasHub!
Author: Hongyu Chiu, fchollet, lukewood, divamgupta
Date created: 2024/10/09
Last modified: 2024/10/24
Description: Image generation using KerasHub's Stable Diffusion 3 model.
Overview
Stable Diffusion 3 is a powerful, open-source latent diffusion model (LDM) designed to generate high-quality novel images based on text prompts. Released by Stability AI, it was pre-trained on 1 billion images and fine-tuned on 33 million high-quality aesthetic and preference images , resulting in a greatly improved performance compared to previous version of Stable Diffusion models.
In this guide, we will explore KerasHub's implementation of the Stable Diffusion 3 Medium including text-to-image, image-to-image and inpaint tasks.
To get started, let's install a few dependencies and get images for our demo:
!pip install -Uq keras
!pip install -Uq git+https://github.com/keras-team/keras-hub.git
!wget -O mountain_dog.png https://raw.githubusercontent.com/keras-team/keras-io/master/guides/img/stable_diffusion_3_in_keras_hub/mountain_dog.png
!wget -O mountain_dog_mask.png https://raw.githubusercontent.com/keras-team/keras-io/master/guides/img/stable_diffusion_3_in_keras_hub/mountain_dog_mask.png
import os

os.environ["KERAS_BACKEND"] = "jax"

import time

import keras
import keras_hub
import matplotlib.pyplot as plt
import numpy as np
from PIL import Image
Introduction
Before diving into how latent diffusion models work, let's start by generating some images using KerasHub's APIs.
To avoid reinitializing variables for different tasks, we'll instantiate and
load the trained backbone and preprocessor using KerasHub's from_preset
factory method. If you only want to perform one task at a time, you can use a
simpler API like this:
text_to_image = keras_hub.models.StableDiffusion3TextToImage.from_preset(
    "stable_diffusion_3_medium", dtype="float16"
)
That will automatically load and configure trained backbone and preprocessor
for you.
Note that in this guide, we'll use image_shape=(512, 512, 3) for faster
image generation. For higher-quality output, it's recommended to use the default
size of 1024. Since the entire backbone has about 3 billion parameters, which
can be challenging to fit into a consumer-level GPU, we set dtype="float16" to
reduce the usage of GPU memory – the officially released weights are also in
float16.
It is also worth noting that the preset "stable_diffusion_3_medium" excludes the T5XXL text encoder, as it requires significantly more GPU memory. The performace degradation is negligible in most cases. The weights, including T5XXL, will be available on KerasHub soon.
def display_generated_images(images):
    """Helper function to display the images from the inputs.

    This function accepts the following input formats:
    - 3D numpy array.
    - 4D numpy array: concatenated horizontally.
    - List of 3D numpy arrays: concatenated horizontally.
    """
    display_image = None
    if isinstance(images, np.ndarray):
        if images.ndim == 3:
            display_image = Image.fromarray(images)
        elif images.ndim == 4:
            concated_images = np.concatenate(list(images), axis=1)
            display_image = Image.fromarray(concated_images)
    elif isinstance(images, list):
        concated_images = np.concatenate(images, axis=1)
        display_image = Image.fromarray(concated_images)

    if display_image is None:
        raise ValueError("Unsupported input format.")

    plt.figure(figsize=(10, 10))
    plt.axis("off")
    plt.imshow(display_image)
    plt.show()
    plt.close()


backbone = keras_hub.models.StableDiffusion3Backbone.from_preset(
    "stable_diffusion_3_medium", image_shape=(512, 512, 3), dtype="float16"
)
preprocessor = keras_hub.models.StableDiffusion3TextToImagePreprocessor.from_preset(
    "stable_diffusion_3_medium"
)
text_to_image = keras_hub.models.StableDiffusion3TextToImage(backbone, preprocessor)
Next, we give it a prompt:
prompt = "Astronaut in a jungle, cold color palette, muted colors, detailed, 8k"

# When using JAX or TensorFlow backends, you might experience a significant
# compilation time during the first `generate()` call. The subsequent
# `generate()` call speedup highlights the power of JIT compilation and caching
# in frameworks like JAX and TensorFlow, making them well-suited for
# high-performance deep learning tasks like image generation.
generated_image = text_to_image.generate(prompt)
display_generated_images(generated_image)

Pretty impressive! But how does this work?
Let's dig into what "latent diffusion model" means.
Consider the concept of "super-resolution," where a deep learning model "denoises" an input image, turning it into a higher-resolution version. The model uses its training data distribution to hallucinate the visual details that are most likely given the input. To learn more about super-resolution, you can check out the following Keras.io tutorials:
- Image Super-Resolution using an Efficient Sub-Pixel CNN
- Enhanced Deep Residual Networks for single-image super-resolution

When we push this idea to the limit, we may start asking – what if we just run such a model on pure noise? The model would then "denoise the noise" and start hallucinating a brand new image. By repeating the process multiple times, we can get turn a small patch of noise into an increasingly clear and high-resolution artificial picture.
This is the key idea of latent diffusion, proposed in High-Resolution Image Synthesis with Latent Diffusion Models. To understand diffusion in depth, you can check the Keras.io tutorial Denoising Diffusion Implicit Models.

To transition from latent diffusion to a text-to-image system, one key feature must be added: the ability to control the generated visual content using prompt keywords. In Stable Diffusion 3, the text encoders from the CLIP and T5XXL models are used to obtain text embeddings, which are then fed into the diffusion model to condition the diffusion process. This approach is based on the concept of "classifier-free guidance", proposed in Classifier-Free Diffusion Guidance.
When we combine these ideas, we get a high-level overview of the architecture of Stable Diffusion 3:
- Text encoders: Convert the text prompt into text embeddings.
- Diffusion model: Repeatedly "denoises" a smaller latent image patch.
- Decoder: Transforms the final latent patch into a higher-resolution image.
First, the text prompt is projected into the latent space by multiple text encoders, which are pretrained and frozen language models. Next, the text embeddings, along with a randomly generated noise patch (typically from a Gaussian distribution), are then fed into the diffusion model. The diffusion model repeatly "denoises" the noise patch over a series of steps (the more steps, the clearer and more refined the image becomes – the default value is 28 steps). Finally, the latent patch is passed through the decoder from the VAE model to render the image in high resolution.
The overview of the Stable Diffusion 3 architecture:

This relatively simple system starts looking like magic once we train on billions of pictures and their captions. As Feynman said about the universe: "It's not complicated, it's just a lot of it!"
Text-to-image task
Now we know the basis of the Stable Diffusion 3 and the text-to-image task. Let's explore further using KerasHub APIs.
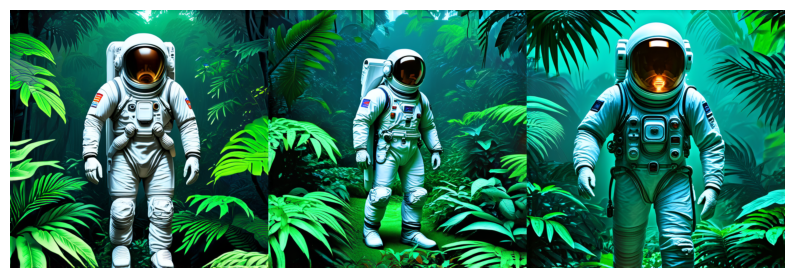
To use KerasHub's APIs for efficient batch processing, we can provide the model with a list of prompts:
generated_images = text_to_image.generate([prompt] * 3)
display_generated_images(generated_images)
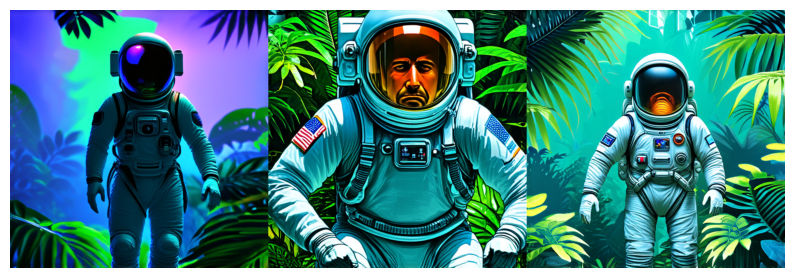
The num_steps parameter controls the number of denoising steps used during
image generation. Increasing the number of steps typically leads to higher
quality images at the expense of increased generation time. In
Stable Diffusion 3, this parameter defaults to 28.
num_steps = [10, 28, 50]
generated_images = []
for n in num_steps:
    st = time.time()
    generated_images.append(text_to_image.generate(prompt, num_steps=n))
    print(f"Cost time (`num_steps={n}`): {time.time() - st:.2f}s")

display_generated_images(generated_images)
Cost time (`num_steps=10`): 1.35s

Cost time (`num_steps=28`): 3.44s

Cost time (`num_steps=50`): 6.18s
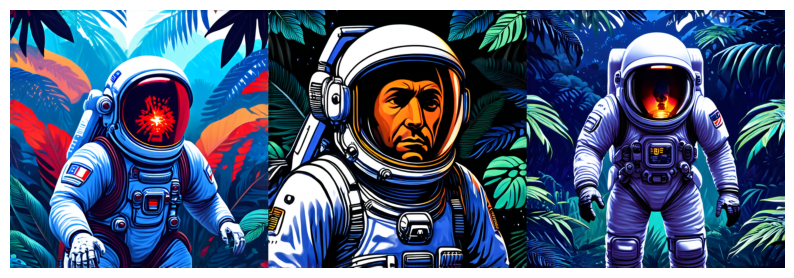
We can use "negative_prompts" to guide the model away from generating specific
styles and elements. The input format becomes a dict with the keys "prompts"
and "negative_prompts".
If "negative_prompts" is not provided, it will be interpreted as an
unconditioned prompt with the default value of "".
generated_images = text_to_image.generate(
    {
        "prompts": [prompt] * 3,
        "negative_prompts": ["Green color"] * 3,
    }
)
display_generated_images(generated_images)
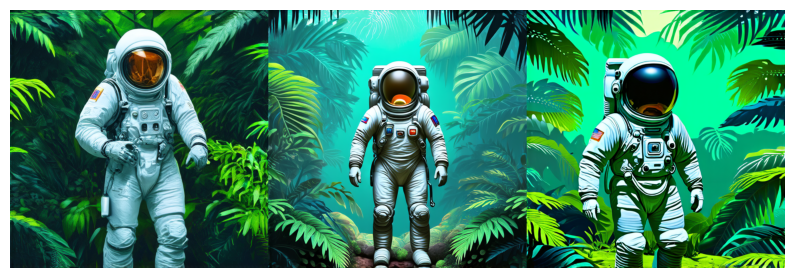
guidance_scale affects how much the "prompts" influences image generation.
A lower value gives the model creativity to generate images that are more
loosely related to the prompt. Higher values push the model to follow the prompt
more closely. If this value is too high, you may observe some artifacts in the
generated image. In Stable Diffusion 3, it defaults to 7.0.
generated_images = [
    text_to_image.generate(prompt, guidance_scale=2.5),
    text_to_image.generate(prompt, guidance_scale=7.0),
    text_to_image.generate(prompt, guidance_scale=10.5),
]
display_generated_images(generated_images)
Note that negative_prompts and guidance_scale are related. The formula in
the implementation can be represented as follows:
predicted_noise = negative_noise + guidance_scale * (positive_noise - negative_noise).
Image-to-image task
A reference image can be used as a starting point for the diffusion process. This requires an additional module in the pipeline: the encoder from the VAE model.
The reference image is encoded by the VAE encoder into the latent space, where noise is then added. The subsequent denoising steps follow the same procedure as the text-to-image task.
The input format becomes a dict with the keys "images", "prompts" and
optionally "negative_prompts".
image_to_image = keras_hub.models.StableDiffusion3ImageToImage(backbone, preprocessor)

image = Image.open("mountain_dog.png").convert("RGB")
image = image.resize((512, 512))
width, height = image.size

# Note that the values of the image must be in the range of [-1.0, 1.0].
rescale = keras.layers.Rescaling(scale=1 / 127.5, offset=-1.0)
image_array = rescale(np.array(image))

prompt = "dog wizard, gandalf, lord of the rings, detailed, fantasy, cute, "
prompt += "adorable, Pixar, Disney, 8k"

generated_image = image_to_image.generate(
    {
        "images": image_array,
        "prompts": prompt,
    }
)
display_generated_images(
    [
        np.array(image),
        generated_image,
    ]
)
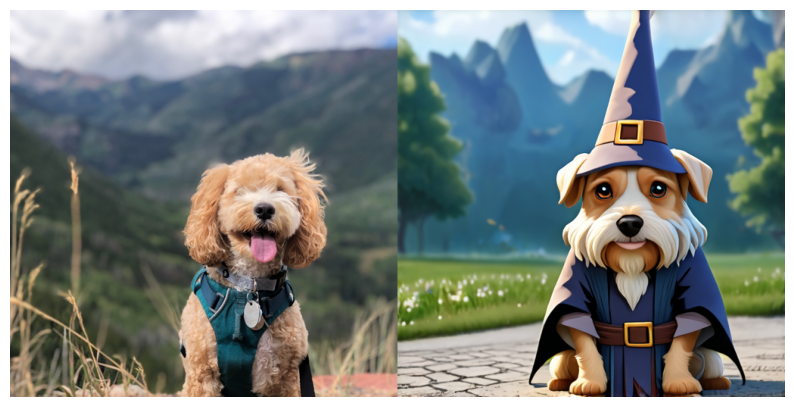
As you can see, a new image is generated based on the reference image and the prompt.
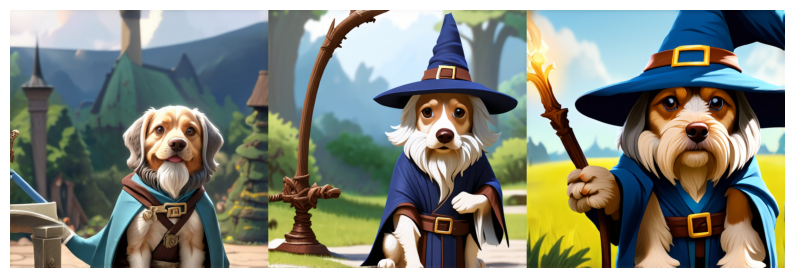
The strength parameter plays a key role in determining how closely the
generated image resembles the reference image. The value ranges from
[0.0, 1.0] and defaults to 0.8 in Stable Diffusion 3.
A higher strength value gives the model more “creativity” to generate an image
that is different from the reference image. At a value of 1.0, the reference
image is completely ignored, making the task purely text-to-image.
A lower strength value means the generated image is more similar to the
reference image.
generated_images = [
    image_to_image.generate(
        {
            "images": image_array,
            "prompts": prompt,
        },
        strength=0.7,
    ),
    image_to_image.generate(
        {
            "images": image_array,
            "prompts": prompt,
        },
        strength=0.8,
    ),
    image_to_image.generate(
        {
            "images": image_array,
            "prompts": prompt,
        },
        strength=0.9,
    ),
]
display_generated_images(generated_images)
Inpaint task
Building upon the image-to-image task, we can also control the generated area using a mask. This process is called inpainting, where specific areas of an image are replaced or edited.
Inpainting relies on a mask to determine which regions of the image to modify.
The areas to inpaint are represented by white pixels (True), while the areas
to preserve are represented by black pixels (False).
For inpainting, the input is a dict with the keys "images", "masks",
"prompts" and optionally "negative_prompts".
inpaint = keras_hub.models.StableDiffusion3Inpaint(backbone, preprocessor)

image = Image.open("mountain_dog.png").convert("RGB")
image = image.resize((512, 512))
image_array = rescale(np.array(image))

# Note that the mask values are of boolean dtype.
mask = Image.open("mountain_dog_mask.png").convert("L")
mask = mask.resize((512, 512))
mask_array = np.array(mask).astype("bool")

prompt = "a black cat with glowing eyes, cute, adorable, disney, pixar, highly "
prompt += "detailed, 8k"

generated_image = inpaint.generate(
    {
        "images": image_array,
        "masks": mask_array,
        "prompts": prompt,
    }
)
display_generated_images(
    [
        np.array(image),
        np.array(mask.convert("RGB")),
        generated_image,
    ]
)
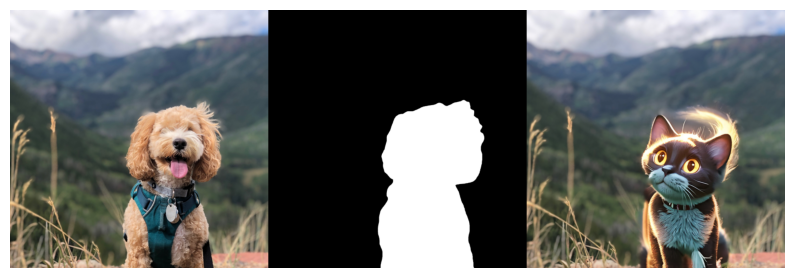
Fantastic! The dog is replaced by a cute black cat, but unlike image-to-image, the background is preserved.
Note that inpainting task also includes strength parameter to control the
image generation, with the default value of 0.6 in Stable Diffusion 3.
Conclusion
KerasHub's StableDiffusion3 supports a variety of applications and, with the
help of Keras 3, enables running the model on TensorFlow, JAX, and PyTorch!